Vtiger is the CRM platform that Frontier’s sales and marketing team uses to keep track of sales notes and contacts. In this lesson you will learn the basic navigation of the program.
Basic Navigation of Vtiger
To start use navigation menu below:
What is Vtiger
Create Organization
Create Contact
Create Opportunity
Create Event
Client Interaction Forms
Create Task
What is Vtiger?
Vtiger is the CRM Frontier uses to record contacts. It helps us keep track of what organization our contacts work for, when someone from our team last spoke to them, and what our future plans are. Keeping accurate records is important to track sales and to distribute targeted marketing mailings. Go to the Website here: Vtiger
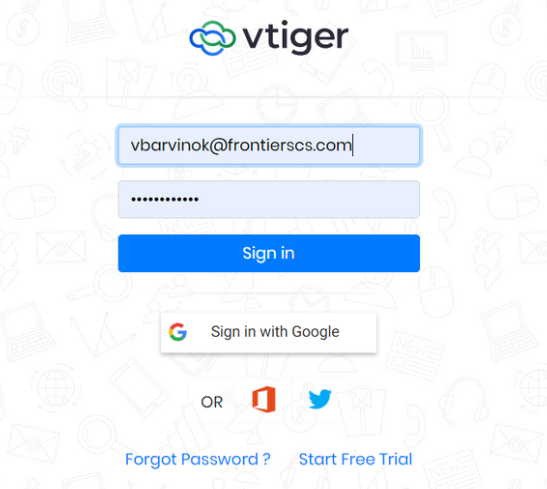
The welcome Screen in Vtiger is your login screen. Enter your Frontier email and create your password to sign in.
Creating a New Organization
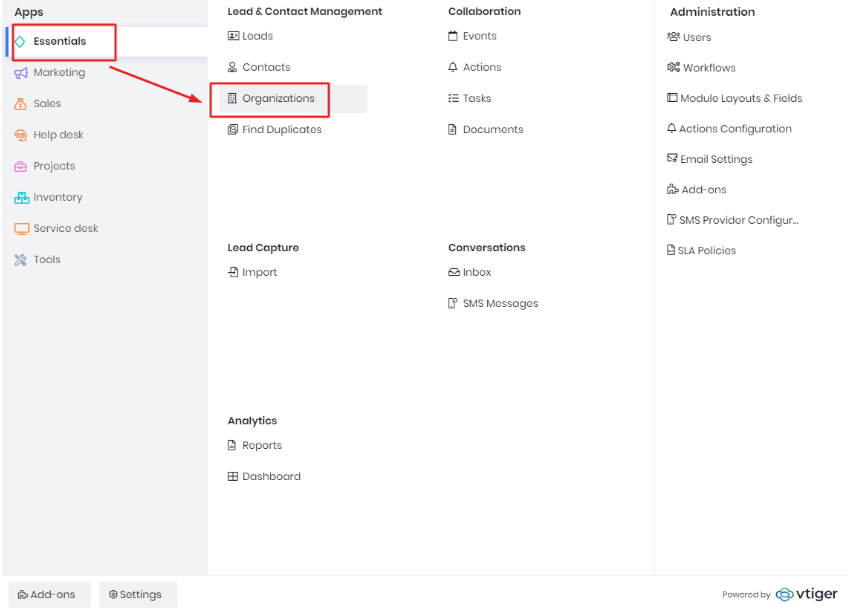
1. Before you can add a new contactyou will have to create a new organization. Under the menu in “Essentials”Apps, find “Organization”
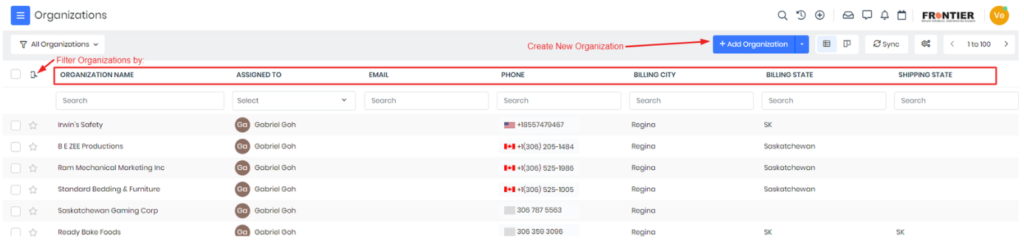
2. In the top right-hand corner select “Add Organization” to add a new organization. In the top left-hand corner, you can use filters to customize your list.
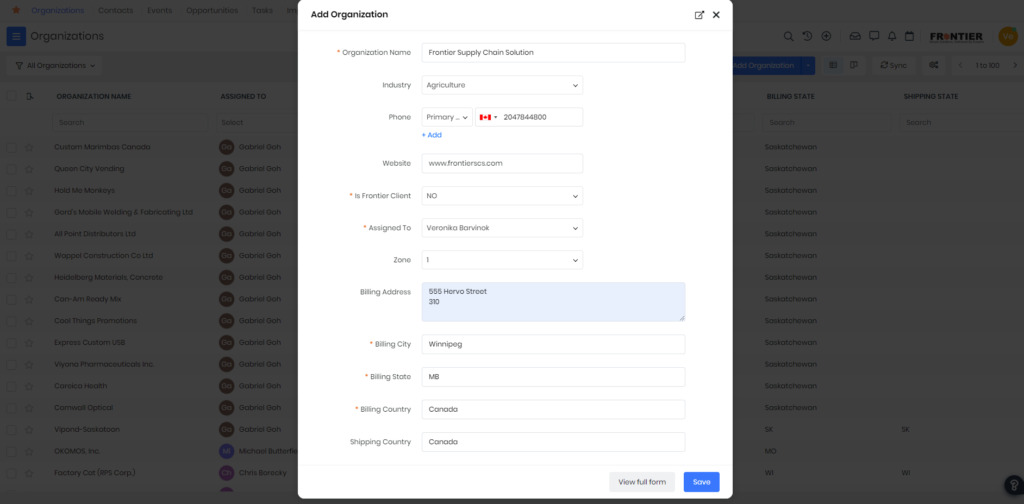
3. Important Information to include for a new organization:
Organization name (obligatory)
Phone number
Website
Email
Industry
Check whether they’re a Frontier client
Services of interest (i.e. courier/Canadian customs brokerage..)
Address
State/Province (two letter abbreviation i.e. Saskatchewan = SK)**
Country
View Form Below:
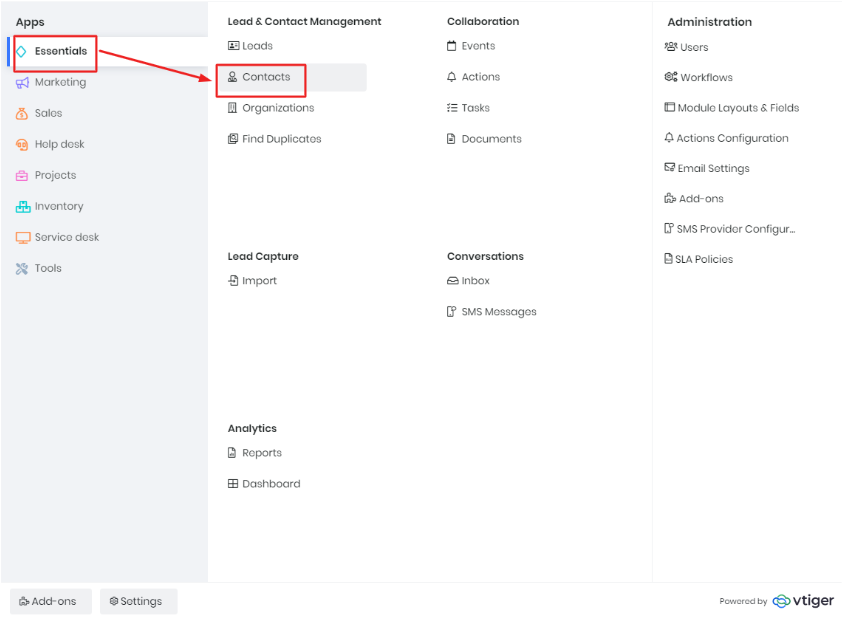
How to Create a New Contact
1. Search in Apps and select in Sales “Contacts”
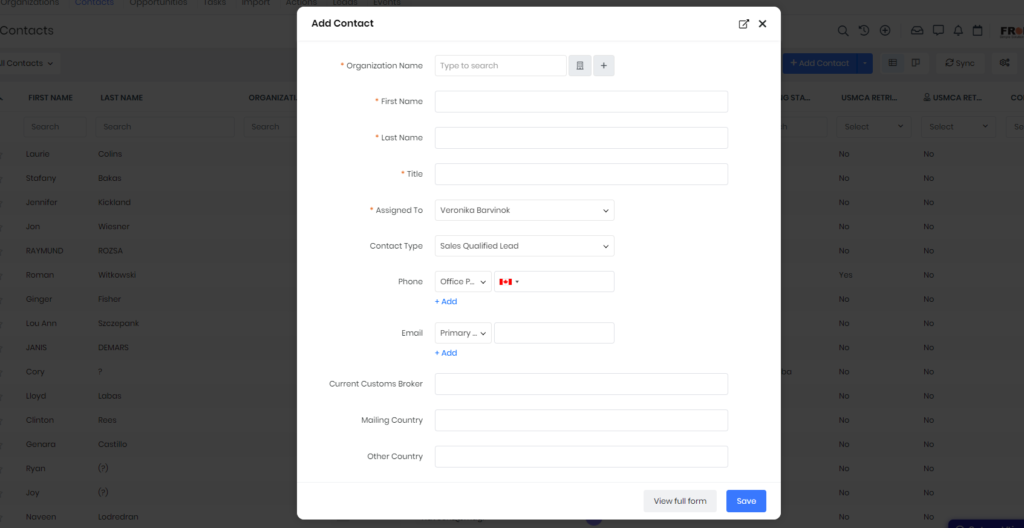
2. Click “Add Contact” in top right corner to open form
3. Note the information that needs to be filled out
Please view form below:
How to Create a New Contact
1. Search in Apps and select in Sales “Contacts”
2. Click “Add Contact” in top right corner to open form
3. Note the information that needs to be filled out:
Opportunity name (organization + service)
Contact name (must already be added to V Tiger)
Organization name (must already be added to V Tiger)
Assigned to (you)
Sales stage
Amount (will most likely be a guess)
Expected close date (will most likely be a guess)
Which service is the opportunity
*Create a new opportunity for each service that you are looking to sell*
Please view form below:
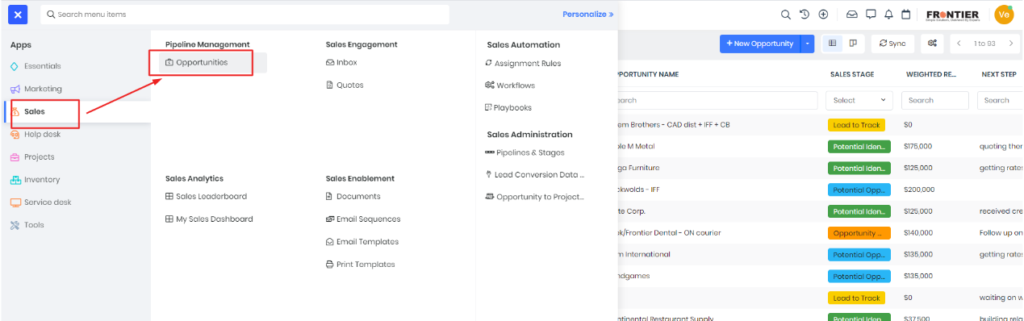
How to Create a New Opportunity
Opportunity is a potential sales deal or business opportunity. It is a record that represents a potential sale of a product or service to a customer or prospect. It is used to track and manage the sales pipeline.
Important: “When do you enter an opportunity?” – When salesperson identifies a potential sales opportunity.
1. Search in Apps and select in Sales “Opportunities”
2. Click “Add Opportunity” to open short form
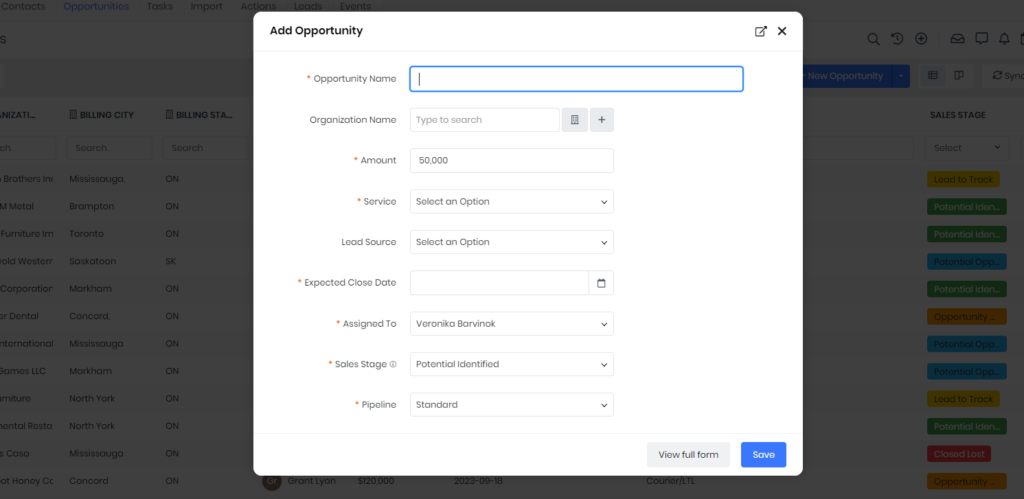
3. Note the information that needs to be filled out:
Opportunity name (organization + service)
Contact name (must already be added to V Tiger)
Organization name (must already be added to V Tiger)
Assigned to (you)
Sales stage
Amount (will most likely be a guess)
Expected close date (will most likely be a guess)
Which service is the opportunity
*Create a new opportunity for each service that you are looking to sell*
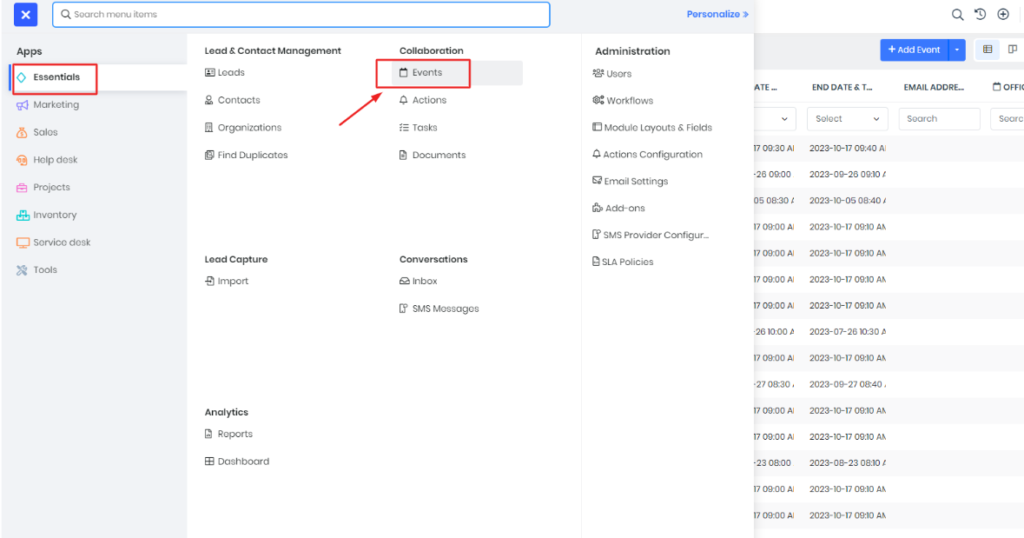
Creating a New Calendar Event
1. Search in Menu in“Essentials” andfind “Events”
2. Click “Add Event” in the top right.
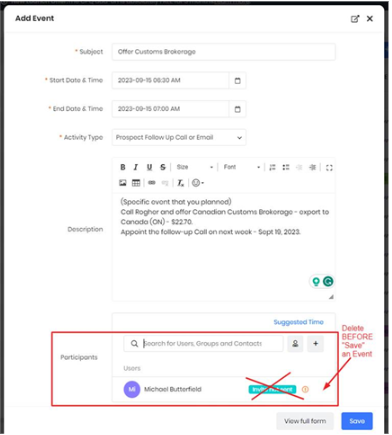
Fill out the “Quick Create Event” form
For Phone calls/Meetings
IMPORTANT! DELETE the invite for client BEFORE finishing the form.
ALWAYS create a calendar Event related to a specific CONTACT, not an organization**
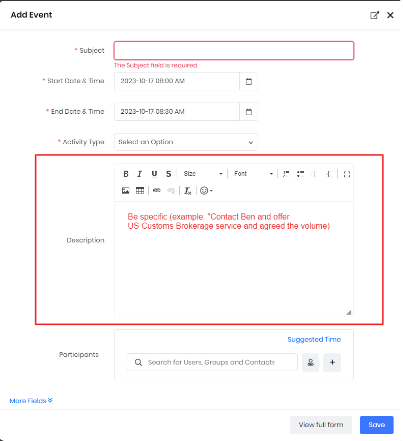
Be specific in the subject to remind yourself of what to do (don’t just put call ____)
Create the exact time your will perform that event
Change status to planner
For activity type, the first interaction is a prospecting call.
Then follow the steps in the sales funnel
After the event fill out, the status is either (held, not held, or cancelled)
Client Interaction Form
Create your Client Interaction Form as a Calendar Event
ALWAYS create a calendar event related to a specific CONTACT not organization**
Title each Event with the company name and contact
Take note of clients’ comments in the “Description” box below
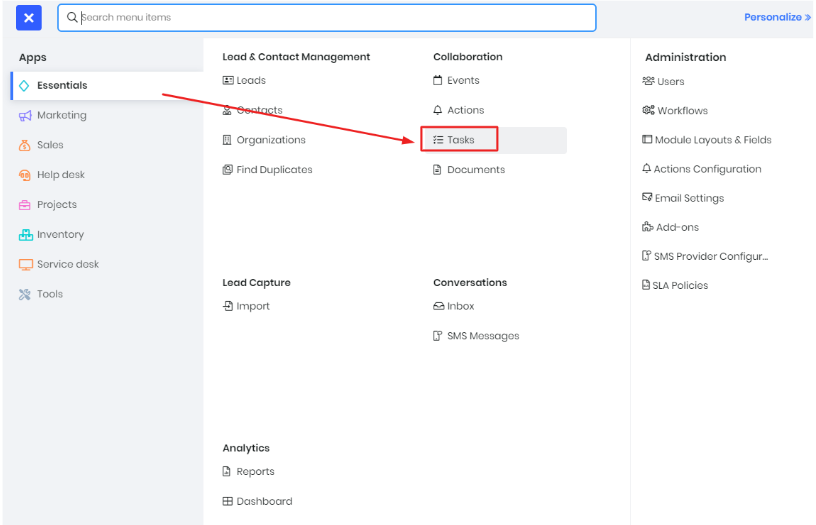
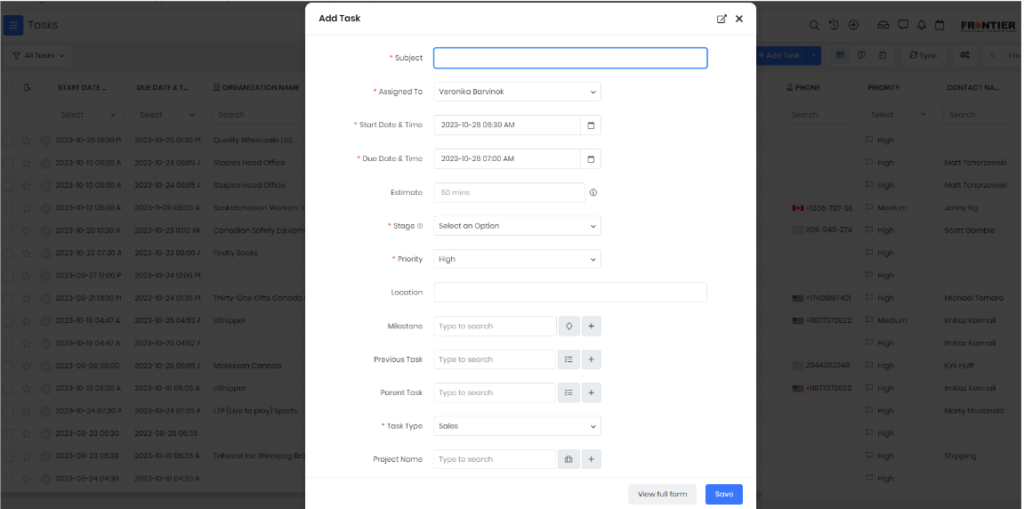
Creating a Task
1. Search in Menu in“Essentials” andfind “Task”
2. Click “Add Task” in the top right.
Fill out the “Quick Create Task” form
3. Note the information that needs to be filled out (red start mark obligatory to fill in):
Task name (organization + service)
Assigned to (you)
Starting Date & Time
Due Date & time (Expecting day and time of ending task)